
ยท 4 min read
Daniel Jette

We're thrilled to announce the stable release of Testify 2.0, a significant leap forward in Android Screenshot Testing! ๐ŸŽ‰ Testify empowers developers to enhance test coverage by including the UI layer in their testing, providing a robust tool for monitoring UI quality and detecting unintended changes in view rendering.

With Testify 2.0, effortlessly set up a variety of screenshot tests in your application, offering a new perspective for monitoring UI experiences and reviewing changes. This release marks a milestone, delivering a testing solution that seamlessly adapts to your needs, ensuring a dependable and feature-rich experience for Android developers. Establishing a comprehensive set of screenshot tests for your application has never been easier.

Key Goals of the Testify 2.0 Architectureโ€‹

Core Functionality Separationโ€‹

Testify 2.0 focuses on providing a highly customizable and configurable core library with pre-built solutions for common testing scenarios. The new architecture separates the core screenshot functionality from the JUnit4 lifecycle and AndroidTestRule, opening up new possibilities for expansion, customization, and adaptation to multiple testing requirements.

Architecture Diagram

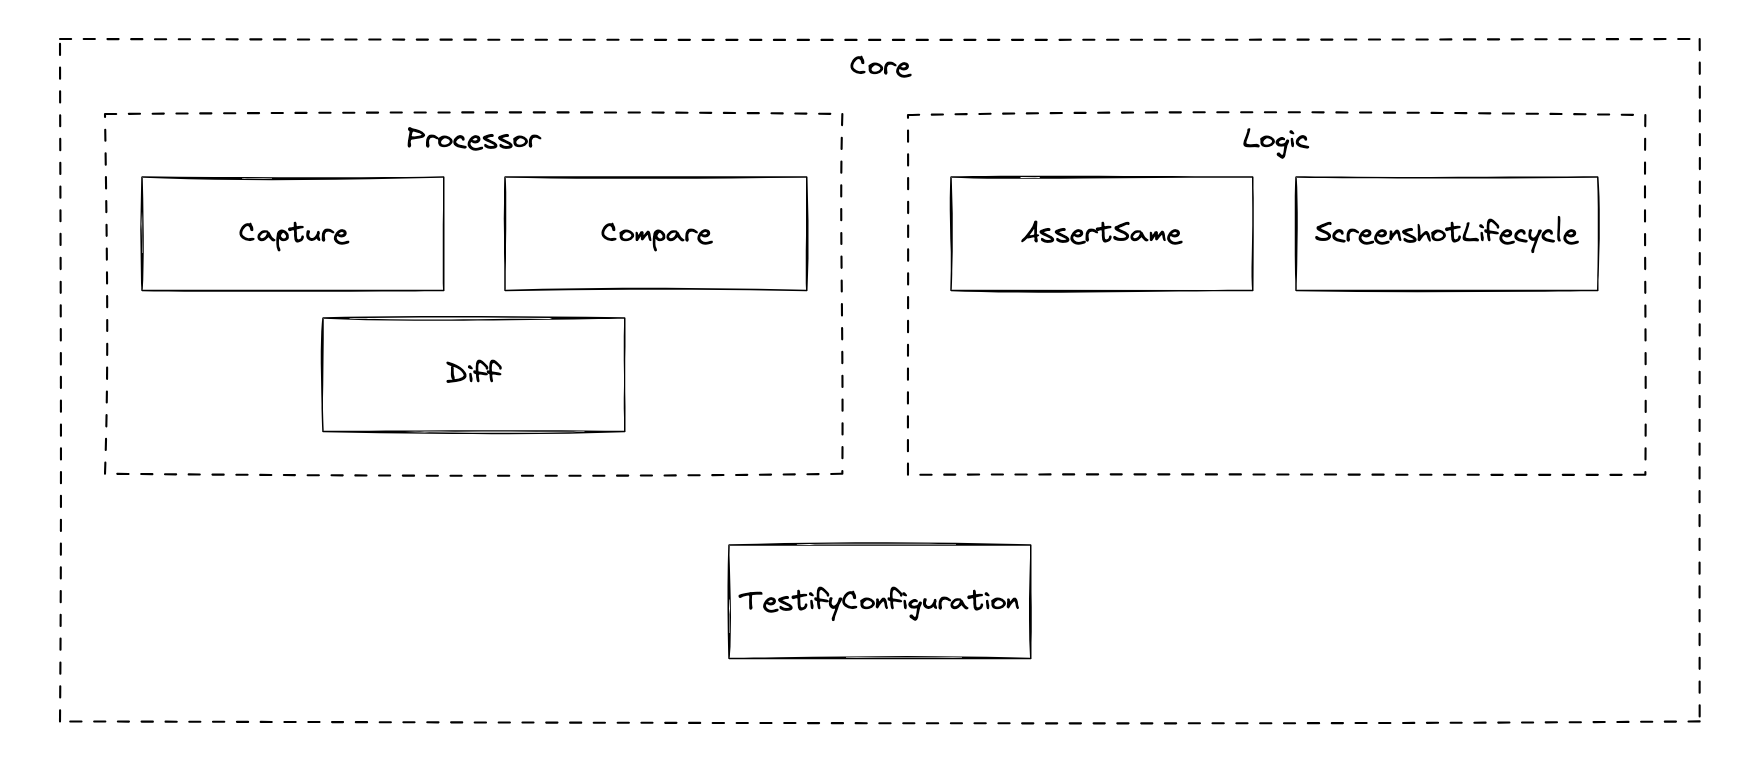
The core library in Testify 2.0 is designed to support classic Android Views, Compose UI, and Surface Views. It is highly modular, offering a scalable, programmable, and extensible API set to cover a wide range of testing scenarios. The primary goal of the 2.0 architecture was to separate Testify into extensible and reusable components, allowing unparalleled customization to meet all of your testing needs. For example, the new TestifyConfiguration class allows you to easily configure and customize your screenshot tests to handle a multitude of UI setups.

The new CaptureMethod and CompareMethod interfaces allow you to write and plug-in any custom screenshot capture or comparison logic you desire.

Many internal and helper functions are now available as public methods, allowing you to leverage Testify in new and original ways.

Plugins & Extensionsโ€‹

A key feature of the Testify 2.0 architecture is its use of Plugins and Extensions.

Plugins provide improvements to, and integrations with, common client-side development tools. Their goal is to improve developer productivity and happiness. The Gradle Plugin offers tasks for recording baseline images, running tests, viewing diagnostics, and generating reports, while the IntelliJ Platform Plugin provides GUI integration directly into Android Studio for accessing common actions.

Extensions offer developers the opportunity to expand upon the existing Testify patterns by easily slotting in new functionality. Provided Testify Extensions allow for testing accessibility, composables from Jetpack Compose, or capturing the whole screen. These extensions can be used to improve the quality of your tests or perform advanced testing scenarios. Or, you may now easily provide your own extensions to further customize Testify.

For example, the Fullscreen Capture Method allows you to capture the entire device screen, including system UI, dialogs, and menus.

The Accessibility Checks extension allows you to combine visual regression testing with accessibility checks to further improve the quality and expand the reach of your application.

Sample Application Enhancementsโ€‹

Testify 2.0 introduces additional, expressive sample codes to help get you started on with screenshot testing. You can now find examples showcasing Testify being used with Jetpack Compose, Gradle Managed Devices, Dependency Injection, and Android Clean Architecture.

The comprehensive set of sample applications demonstrate the usage of all public methods and extension libraries as well as providing examples of commonly tested scenarios.

How to Get Startedโ€‹

To explore the new features and improvements in Testify 2.0.0, follow our documentation for installation instructions and usage guidelines.

To learn how to tackle more advanced testing scenarios, check out our Recipe Book.

We encourage developers to provide feedback, report issues, and contribute to the Testify community on GitHub. Your insights help us make Testify even better!

Thank you for being a part of the Testify journey. Embrace the future of Android Screenshot Testing with Testify 2.0!

Happy testing! ๐Ÿ“ธ


Changelogโ€‹

For a detailed list of changes and enhancements in Testify 2.0.0, check out the changelog.

ยท 3 min read
Daniel Jette

Testify, the open-source library for Android Screenshot Testing, is gearing up for a significant change in its release strategy. We are excited to announce the adoption of Semantic Versioning, a standardized versioning system that promises to bring more clarity and efficiency to Testify's development process.


Testify empowers Android developers to effortlessly set up screenshot tests for their applications. Capturing screenshots offers a valuable tool for monitoring UI quality and reviewing changes efficiently. As Testify continues to evolve, we are making pivotal changes to our release process, transitioning to Semantic Versioning for a more streamlined and user-friendly experience.

Testify currently follows a custom release process where Major Versions are set as milestones leading up to a complete feature set. This approach, while effective, has resulted in long release cycles, stretching over many month. This has prompted us to explore a more standardized versioning system for improved communication and quicker releases.

The decision to embrace Semantic Versioning is driven by a desire to move more quickly, providing more frequent changes while better communicating the risk of changes and backward compatibility expectations. This change aims to enhance the overall development experience for Testify users and contributors.

These changes will take effect following the public release of Testify 2.0.0 in late Q4, 2023.

Benefits of Semantic Versioningโ€‹

  • More Agile Development: Frequent releases for smaller, focused changes.
  • Improved Communication: Clear versioning communicates the nature of changes effectively.
  • Clearer Backward Compatibility Expectations: Users can quickly assess the risk associated with each release.

Release Cadence and Versioning Schemeโ€‹

Testify will adopt the three-component Semantic Versioning scheme and release cadence which aligns with industry best practices:

  • Major Versions (X.0.0): Significant changes, potentially including breaking API changes. Incremented for incompatible API changes.
  • Minor Versions (X.Y.0): Backward-compatible additions of new features or enhancements. Increased for backward-compatible feature additions.
  • Patch Versions (X.Y.Z): Backward-compatible bug fixes and minor improvements. Raised for backward-compatible bug fixes.

Under the new system, there will be no pre-release builds, and all changes will be categorized directly under the appropriate Semantic Version.

Communication Strategyโ€‹

To keep the Testify community well-informed, we have devised a comprehensive communication strategy:

  • Changelog: A detailed changelog for all releases, available on Testify.dev and GitHub.
  • Blog Posts: Major version updates will be accompanied by detailed blog posts on Testify.dev.
  • Documentation Updates: Regular updates with every Major and Minor release.

Ensuring the stability and backward compatibility of Testify is paramount. A robust set of regression tests will verify backward compatibility for each release.

Community Involvementโ€‹

We value community involvement and encourage users to actively participate:

  • GitHub Interaction: Log bugs, submit requests, and propose changes directly through the GitHub repository.
  • Stack Overflow Tag: Tag questions with android-testify on Stack Overflow for community-driven support.

Testify is on a journey of continuous improvement, and the adoption of Semantic Versioning is a crucial step in this evolution. We look forward to a more agile, transparent, and collaborative future with our vibrant community.

Stay tuned for more updates and releases as Testify embraces Semantic Versioning for a brighter tomorrow!

ยท 4 min read
Daniel Jette

We're thrilled to unveil an exciting addition to Android Testify, our open source project revolutionizing the way you conduct screenshot tests for your Android applications. Introducing Gradle Managed Devices Support, a feature designed to streamline your testing process and enhance the overall efficiency of your UI testing suite.


Understanding Gradle Managed Devicesโ€‹

Gradle Managed Devices is a powerful capability that allows you to manage and control Android emulators directly through Gradle. This means you can easily set up and configure virtual devices for testing directly within your build scripts, automating the process and ensuring a consistent testing environment across various projects and team members.

Why Use Gradle Managed Devices?โ€‹

  1. Consistency and Reproducibility: By defining the emulator configurations in the Gradle build scripts, you ensure that all team members have access to the same testing setups. This promotes consistent testing across different development environments.

  2. Simplified Configuration: Managing emulators directly through Gradle simplifies the setup process for testing different resolutions, orientations, API versions, and languages. Developers can easily switch between configurations without manually adjusting emulator settings.

  3. Integration with Continuous Integration: Gradle Managed Devices seamlessly integrates with most Continuous Integration (CI) services, allowing for automated and reliable UI testing as part of your CI/CD pipeline.

Now, let's delve into how you can leverage this new feature in Android Testify to optimize your UI testing workflow.

Using Gradle Managed Devices with Android Testifyโ€‹

To take advantage of Gradle Managed Devices support in Android Testify, follow these simple steps:

  1. Upgrade Testify to Beta 4: Update the classpath for the Testify plugin to version 2.0.0-beta04.
buildscript {
repositories {
mavenCentral()
}
dependencies {
classpath "dev.testify:plugin:2.0.0-beta04"
}
}
  1. Update Your Gradle Build File: In your project's build.gradle file, ensure you have the necessary dependencies and configurations to enable Gradle Managed Devices support.
android {
...
testOptions {
managedDevices {
devices {
pixel2api30 (ManagedVirtualDevice) {
// Use device profiles you typically see in Android Studio.
device = "Pixel 2"
// Use only API levels 27 and higher.
apiLevel = 30
// To include Google services, use "google".
systemImageSource = "aosp"
}
}
}
}
}

Customize the devices block according to your specific testing needs, specifying the device name, API version, locale, and orientation.

In addition, enable TestStorageService to receive screenshots after test execution:

android {
defaultConfig {
testInstrumentationRunnerArguments useTestStorageService: "true"
}
}

dependencies {
androidTestUtil("androidx.test.services:test-services:1.4.2")
}
  1. Configure the Testify Library: To instruct Testify to use Test Storage for storing screenshots and diffs, modify the Testify plugin configuration in your build.gradle file.
testify {
useTestStorage true
}

Running Screenshot Testsโ€‹

To perform screenshot test verification using the Gradle Managed Devices you configured, use the following command. device-name is the name of the device you configured in your Gradle build script (such as pixel2api30), and BuildVariant is the build variant of your app you want to test (such as Debug).

./gradlew device-nameBuildVariantAndroidTest
tip

Due to using Gradle Managed Devices using Test Storage to save screenshots, the screenshotPull task is unavailable. After execution, you can find any recorded screenshot in your module's build/outputs/managed_device_android_test_additional_output/ folder.

Updating Baselinesโ€‹

Since Gradle Managed Devices requires the use of their specific Gradle tasks, we cannot use the normal screenshotRecord task to udate our baselines. To generate a new baseline, you now have two options:

  1. Enable Record Mode on the ScreenshotRule: Apply necessary settings to the ScreenshotRule in Kotlin.
@get:Rule val rule = ScreenshotRule(TestActivity::class.java)

@ScreenshotInstrumentation
@Test
fun default() {
rule
.setRecordModeEnabled(true)
.assertSame()
}
  1. Enable the Testify Gradle Setting: Enable record mode in the build.gradle file:
testify {
recordMode true
}

Once again, due to the specific Gradle task requirement, the screenshotPull task cannot be used. After execution, navigate to the module's build/outputs/managed_device_android_test_additional_output/ folder and copy the recorded baseline into a folder named after your device configuration inside androidTest/assets/screenshots/ directory.

Happy Testingโ€‹

With these updates in place, you're now set to harness the potential of Gradle Managed Devices in Android Testify for enhanced screenshot tests.

We're excited to see how this enhancement elevates your UI testing process with Android Testify.

This feature is still in beta, so please let us know if you have any questions or need further assistance in implementing this feature, feel free to reach out! Happy testing!

Stack Overflow | GitHub Issues


ยท 2 min read
Daniel Jette

Testify is a powerful Android plugin that provides a selection of utility tasks for advanced use cases in screenshot testing. With Testify, developers can easily create, compare, and report screenshots of their app across different devices, locales, and screen sizes.

In the latest release of Testify, we've added a new setting that allows developers to customize the instrumentation annotation used to identify which test is a screenshot test. This means that the @ScreenshotInstrumentation annotation is no longer a required element in your code.

Why This Change?โ€‹

The @ScreenshotInstrumentation annotation was previously required for Testify to identify screenshot tests. This annotation added an additional layer of complexity to the testing process and could cause confusion for developers who were new to Testify. By introducing the ability to customize the annotation, we hope to simplify the testing process and make Testify more accessible to a wider range of developers.

How to Use the New Settingโ€‹

To use the new Testify setting, developers can now add a screenshotAnnotation parameter to their build.gradle file. This parameter allows developers to specify the name of the annotation that they are using for their screenshot tests. Here's an example:

testify {
// Set the instrumentation annotation used for screenshot tests
screenshotAnnotation = "com.example.MyScreenshotAnnotation"
}

In this example, we're setting the screenshotAnnotation parameter to "com.example.MyScreenshotAnnotation". This tells Testify to look for tests annotated with @com.example.MyScreenshotAnnotation to identify screenshot tests.

If you don't specify a screenshotAnnotation, Testify will use the default @ScreenshotInstrumentation annotation.

Conclusionโ€‹

By adding the ability to customize the instrumentation annotation used to identify screenshot tests, we've made Testify even more powerful and accessible to developers. We hope that this new setting will simplify the testing process and make it easier for more developers to use Testify in their Android apps.

If you have any questions or feedback on this new feature, please don't hesitate to reach out to us on our GitHub page.